Everyone loves an alternative...
So you got your new Steam Deck. You’ve got games that you want to take on the go, but they aren’t all purchased through Steam itself. Hell, you may not be a fan of SteamOS or Linux and that’s totally fair. The great thing with this versatile little-big machine is that it’s capable of running other storefront’s with some tweaking and installation involved. But let’s say you don’t want to go through the hassle of searching for third party software to enable said storefronts like an Epic Games Store, or GOG. You just want to install it, download your games and play… right? You just want to use your Steam Deck like a portable PC – a Windows PC one might suggest. Well I’m going to show you how to do so. I should mention that there are a few caveats involved with this process.
One being that Windows has not been fully optimised for the Steam Deck, and while it runs, it won’t run your Steam library any better, than what the stock software is capable of. The second is with Windows bloatware comes unnecessary background processes which causes the next issue. That issue being fan noise, your Steam Deck’s fan will do it’s best to keep its APU cool but won’t slow down its fan, so expect it to be a little noisier than running SteamOS. The Steam Deck supports Windows 10 and Windows 11, both which can be downloaded free, directly from Microsoft’s website, but there are alternative versions of the OS that are much more lightweight, run barebones without background processes and are faster to use. Saying this, you have a choice to install the official version Windows (Recommended) or the modified ISO Windows Superlite from GhostSpectre, which will need a few extra steps in setting up on your USB drive, to which you may follow on its website provided.
- A USB Stick with at least 8GB of Storage.
- The official Steam Dock or a USB-C Multiport adapter compatible with the Steam Deck.
- The official Deck to Windows Drivers from Valve (Best to download them now and unzip them all for later).
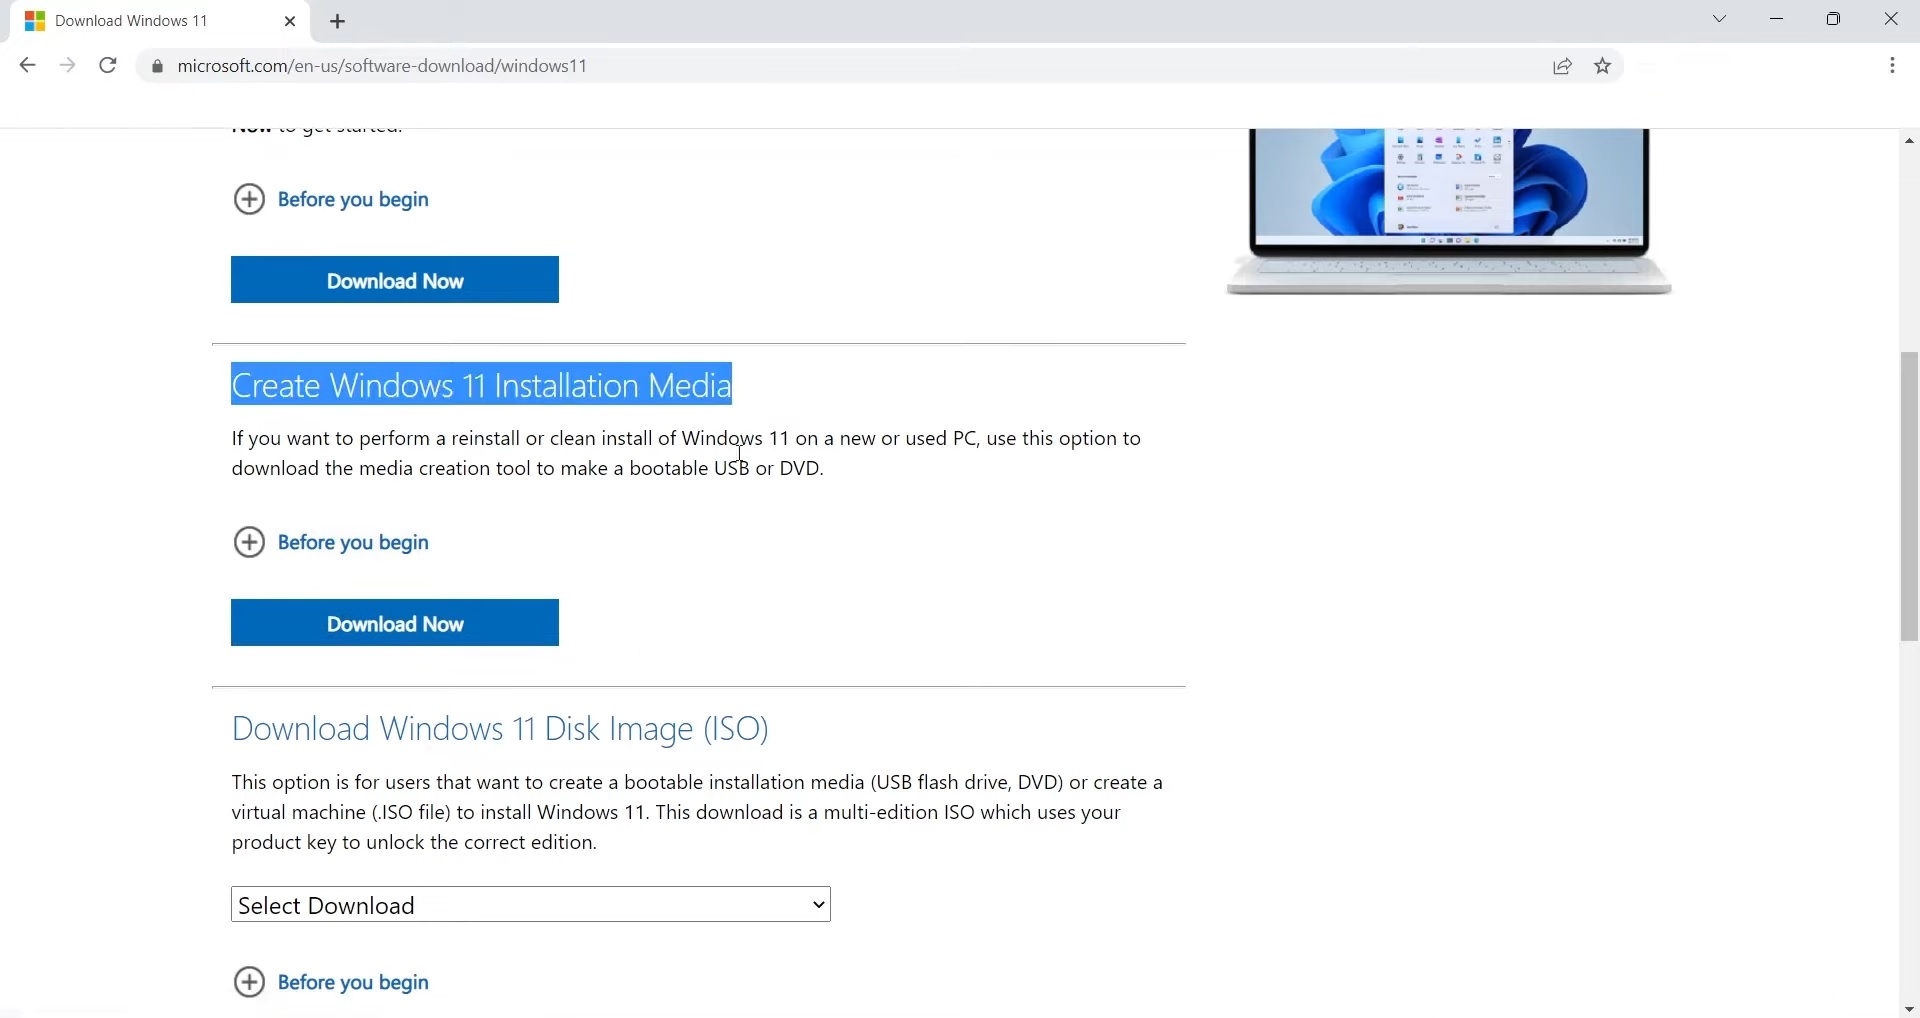
Download the Windows Installation Media tool (Windows 11/Windows 10), then run the .exe file. The program will open up with the usual EULA, click Accept. Next, Select your language and edition – I would keep it stock standard here as it prompt you to choose which edition you want in the setup. You can choose to use the same options from the PC you’re using or install it with a clean slate (Recommended). Then choose the USB flash drive as your media of choice, make sure the stick you’re using is one you intend to be formatted – YOU WILL LOSE ALL DATA THAT YOU HAVE ON YOUR USB STICK, SO BACK IT UP IF YOU NEED TO – choose the USB drive you intend to install Windows to, double check and be sure the drive you select IS INDEED the USB flash drive and you haven’t accidentally picked another drive on your PC, then click Next. The process should begin to install Windows to your USB Flash Drive, then once it’s done it should say that “Your USB flash drive is ready”, you can click Finish here, and remove the flash drive from your PC.
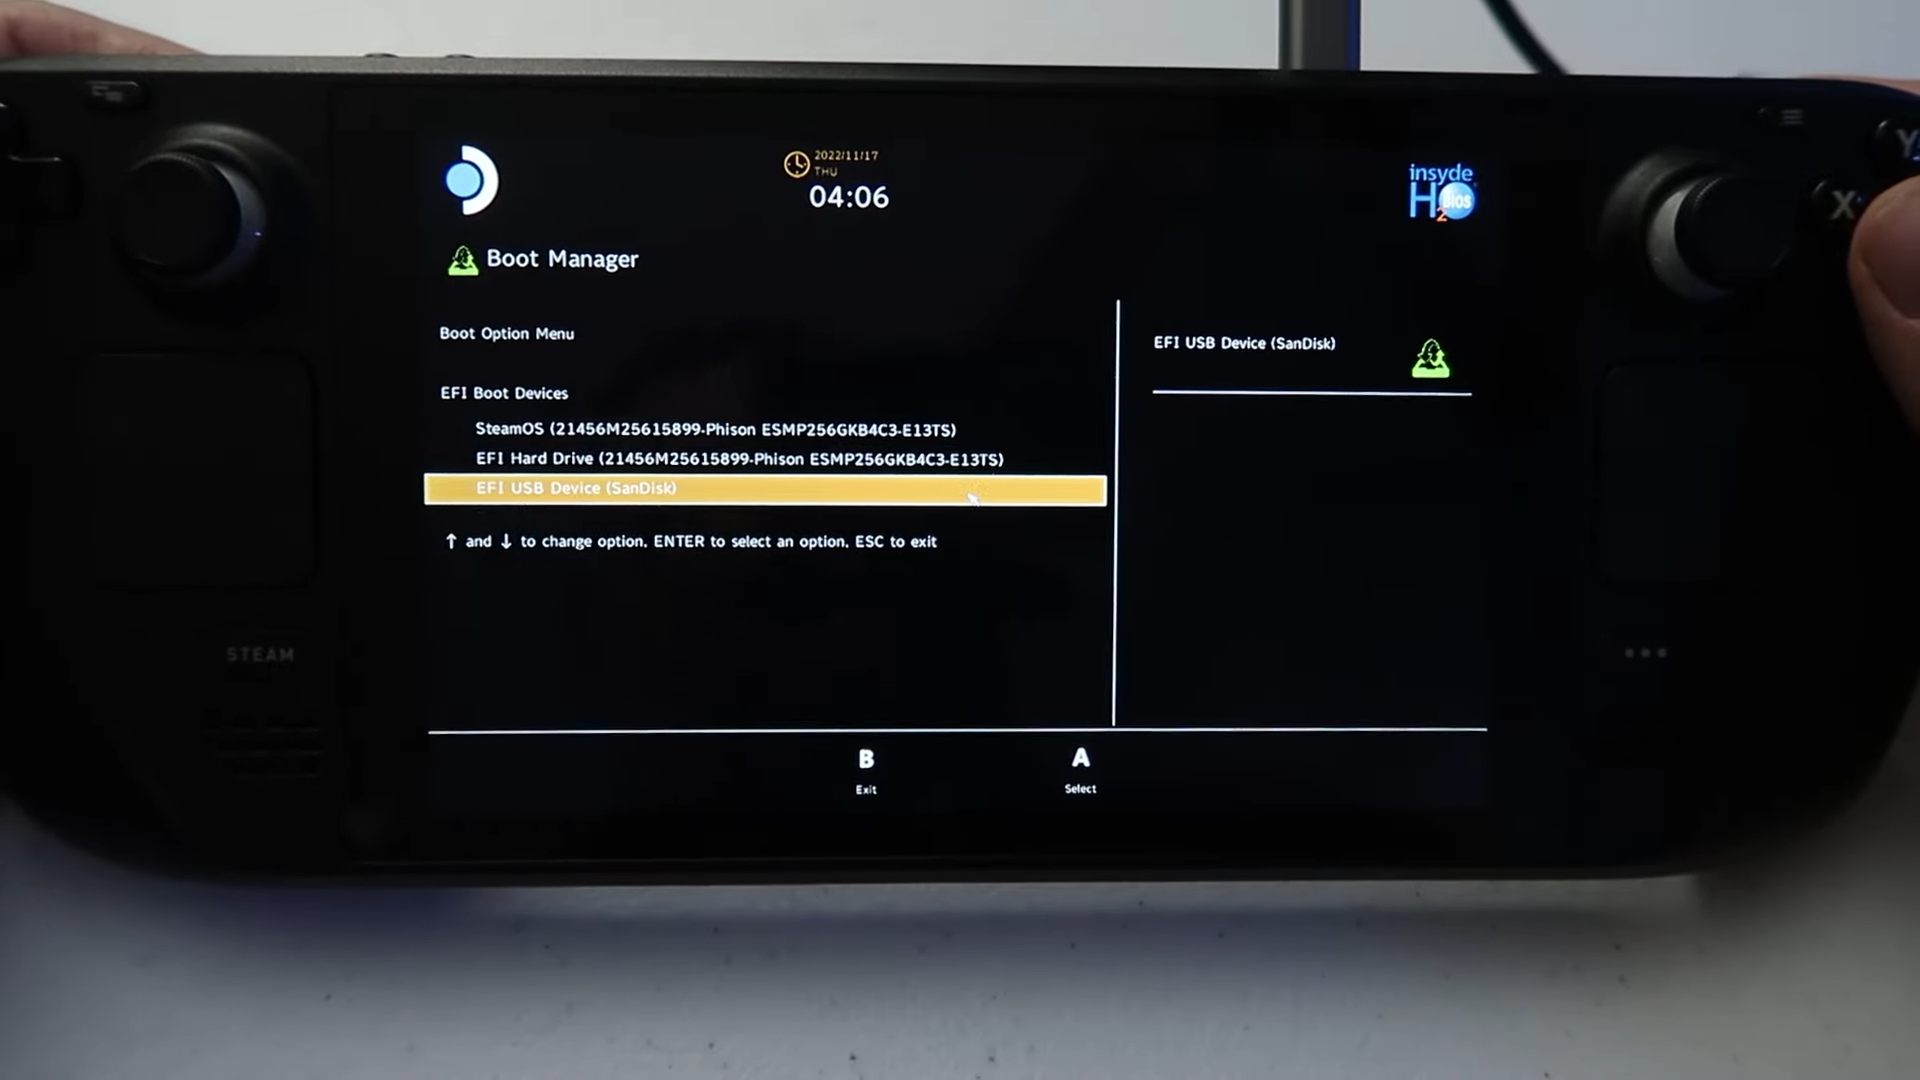
I’ll preface this once again by stating that this process will wipe your Deck. It will not carry over pre-existing installations of titles from SteamOS to Windows. So now that you know this and want to continue, Shutdown your Steam Deck until the screen goes entirely black. Dock your Steam Deck or plug in the USB-C Multiport Adapter, and plug in your USB stick. Hold down the Volume Up (+) button atop the unit, and press power on like you would booting up the Deck. This will take you into the Deck’s BIOS, where you will press Right on the Steam Deck’s D-PAD then press “A” to select Boot Manager. This will show a list of boot devices, but be sure to select your USB Stick that has Windows installed on it. It should look something like the image above – ESI USB Device (Brand Name). Once you select the drive, it will begin the Windows setup process and for anyone familiar with it, it’s just like installing Windows on your PC, only that you will have to turn your deck into portrait orientation, and use it like a tablet (with a finger or rubber stylus).
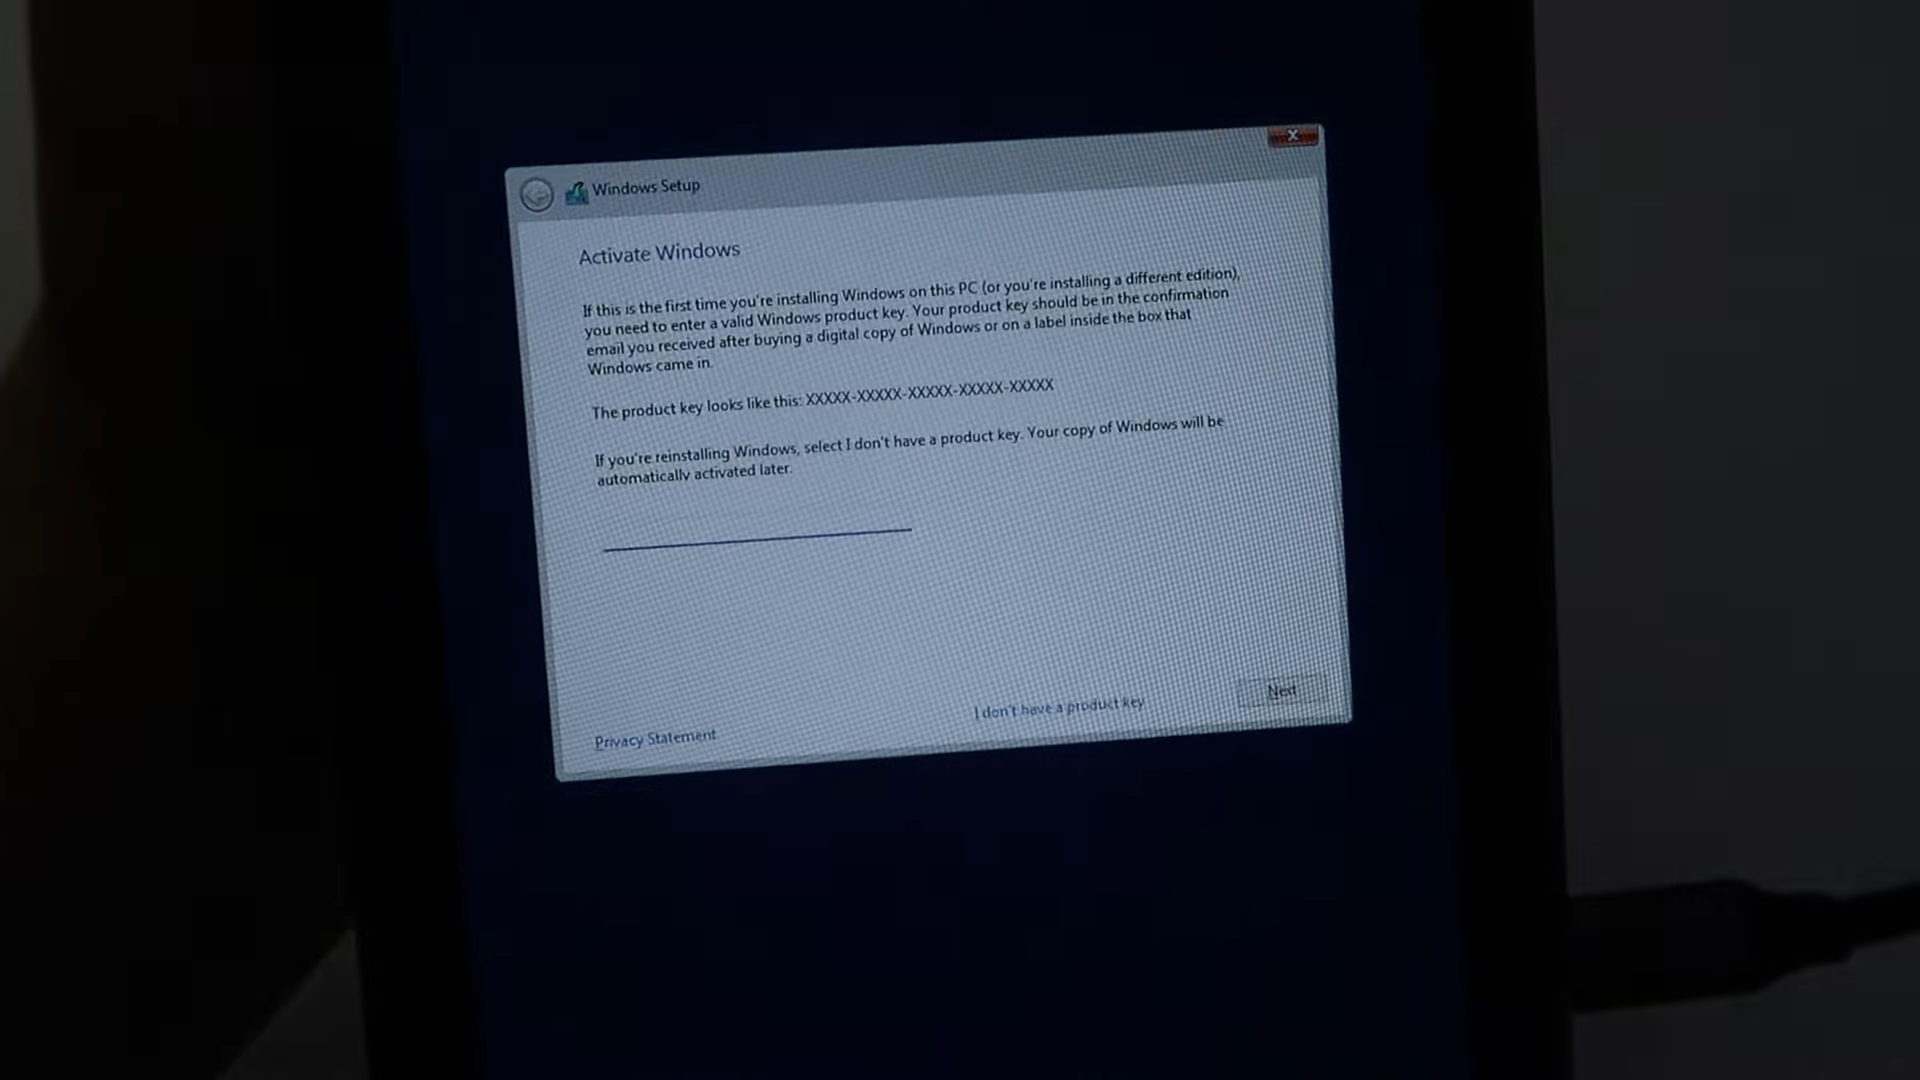
Once the setup begins, Choose your language, then press Next. Then click “Install Now”. Give it a few minutes to get the Setup prepared, then once the screen comes back to the blue screen prompts, it will ask you to Activate Windows. Now this is where things get interesting, as you don’t need to do so, and can select “I don’t have a product Key”, which will continue the setup like normal but if you want to license your copy of Windows, you may purchase a Key directly from Microsoft. Just know if you select the former, after a few weeks it will come up with that annoying watermark on your Desktop, asking you to Activate Windows.
There are alternate methods to go around this by switching out some Hex code in the Windows Registry, but that’s *ahem* a questionable method and breaks the Windows End User License Agreement. Continuing, select the top option which should be Windows 11/10 Home x64, then press Next. Accept the EULA by ticking the box here and press Next. The next part it will ask “Which type of Installation do you want?”, select Custom. A list of drive partitions will show up, here you want to select/highlight all partitions that are Type: Primary, and select Delete below until you have the one partition which should be Type: System. Then select/highlight that and click Next. Windows will do it’s usual setup, so grab a drink or a snack and wait.
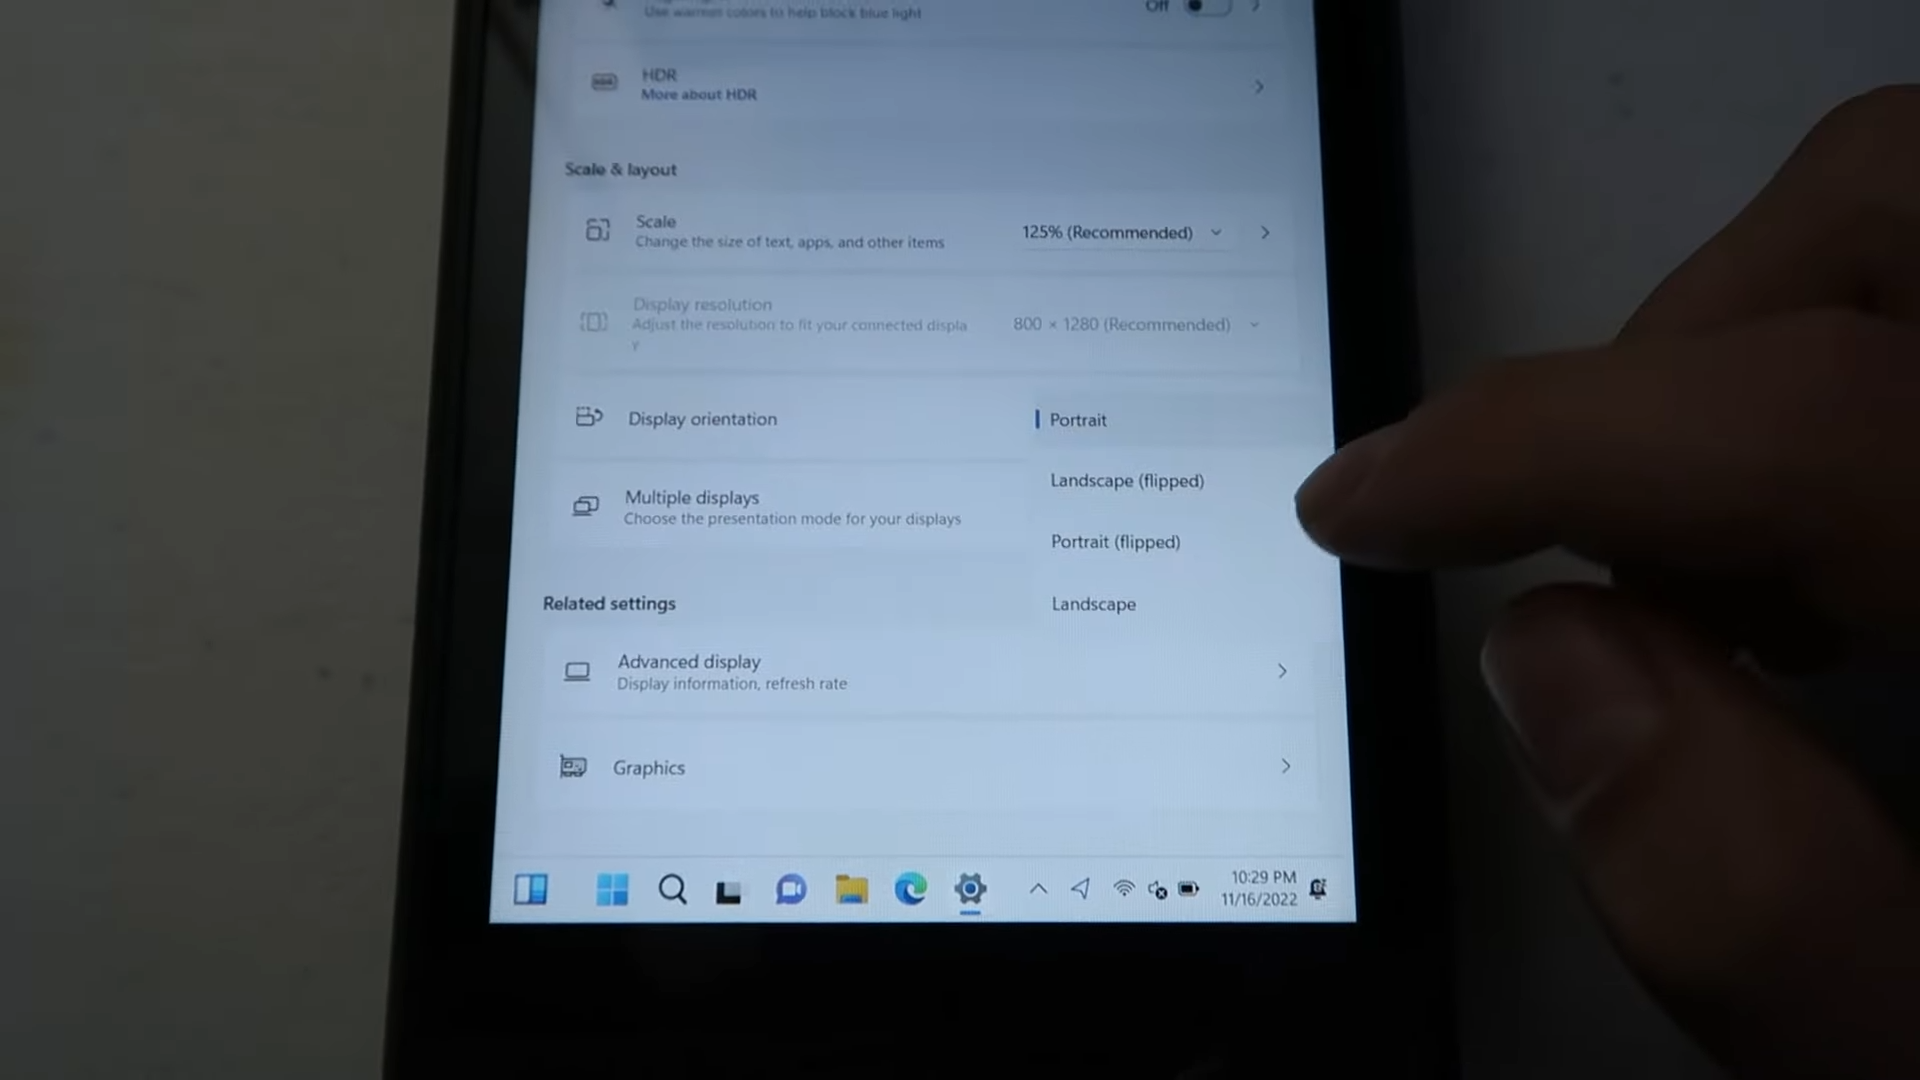
Windows will boot with prompts to customise your settings as to how you want them. You may or may not be able to connect to the internet depending on Windows automatically installing Wi-Fi drivers, but if not that’s okay because the driver will come with the one’s you downloaded from Valve, prior to this process. Once you’re done with the entire setup process and you’re on the desktop, go to the Windows Icon (or Start Button), and select Settings and find “Display”. Once there, scroll down to “Display Orientation” and select Landscape and select “Keep Changes”. This should flip the screen -90°, where you will be able to view the screen as intended. One thing I suggest before moving on, is to head into the File Explorer located on your taskbar – for Windows 10 users, at the top right just below the Close (X) button, you should see an arrow pointing down. Click it to open a drop menu, then on the left hand side, select the “View” tab, and then under “Show/Hide”, tick the box labelled “File name extensions”. For Windows 11 users, at the top click “VIew” then select “Show” and choose “File name extensions”. This will help discern file types when installing the drivers in the next step.
Now head back to your PC and with the same USB stick (or another stick, it’s up to you), copy all folders that you downloaded from Valve, and hopefully unzipped prior to starting the setup process to the stick. Once they have all been copied over, remove the stick from your PC and insert it into the Dock or USB-C Multiport adapter. First thing you want to do is install the APU Drivers located in the “Aerith Windows Driver_XXX” folder by clicking through another subsequent folder with digits, to see “Setup.exe”. It will prompt a Window to show up, just select “Yes”, then click “Install” on the bottom right corner.
Then we want to install the Wi-Fi driver if needed (in most cases you will have to), so head to the folder labelled “RTLWlanE_WindowsDriver_2024.0.10.137_Drv_3.00.0039_Win11.L”, open “Setup.exe”, again press “Yes” on the prompt, then Install the driver with all default selections. Follow the same instructions through the folder labelled “BayHub_SD_STOR_ installV3.4.01.89_W10W11_logoed_20220228”.
Now for Bluetooth, head into the folder labelled “RTBlueR_FilterDriver_1041.3005_1201.2021_new_L” and select Installdriver.cmd. It may or may not show up with a window that states “Windows protected your PC” due to the fact that it’s unrecognised by Microsoft and modifying your Steam Deck’s registry. It’s fine, it’s safe, click More Info then select “Run anyway” at the bottom. Click “Yes” on the prompt that shows up, and then let the command prompt do its thing.
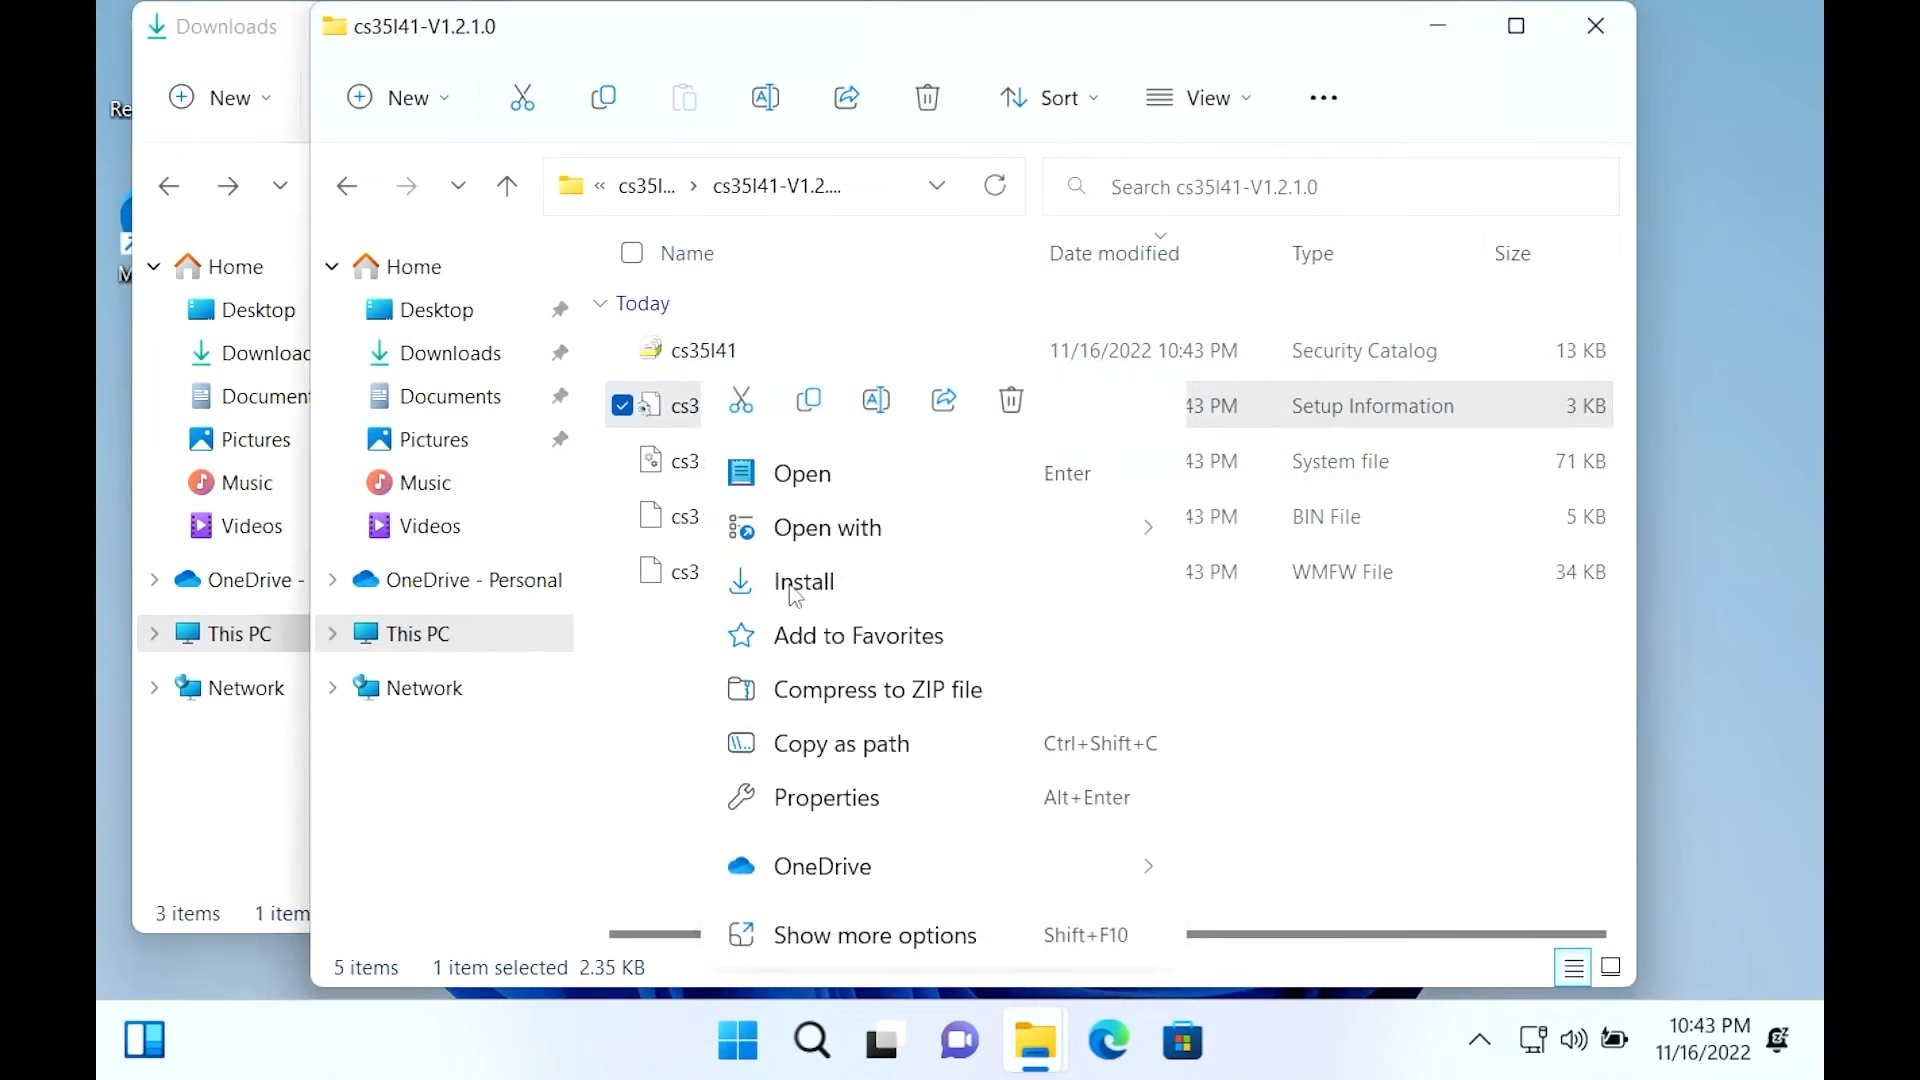
Time for the Audio drivers. Select the folder labelled “cs35l41-V1.2.1.0”, then with your finger or stylus, highlight and hold down on the file “cs35l41.inf”, it will trigger a drop-down menu just like you were right clicking an icon on Windows on a PC, then select Install. It will run a lightning quick installation. Afterward you want to head into the last folder on your stick labelled “NAU88L21_x64_1.0.6.0_WHQL – DUA_BIQ_WHQL” and once again hold down on “NAU88L21.inf” for the drop-down menu to show up and again, select Install. Once this is done, restart Windows to calibrate all drivers you just installed.

It’s recommended you look to see if the version of Windows you have just installed is the latest. If not, head back to Settings through the Start Menu, and Select “Windows Update”. Click “Check for updates”, then see if you’re in need of a quick install. If Windows prompts you to install the latest version, then I highly recommend doing so, then once it’s all complete click “Restart now”. Once Windows boots back in, you’re free to install Steam as you would on a PC, along with your Microsoft Store games – which aren’t available on SteamOS, so there’s a plus. But you’ve essentially turned your Steam Deck into a fully fledged Windows PC. Off you go now, enjoy your freedom, gamer. If you ever want to revert back to SteamOS, we’ll have instructions on how to do so very soon.
